 Free plan
Chunky console table
1524 mm × 355.6 mm × 762 mm
Cut list
| Part | Qty | L × W × T (mm) | Note |
|---|---|---|---|
| Leg — nominal 2×4 | 4 | 723.9 × 88.9 × 38.1 | Step 1: cut four square-ended legs to 723.9 mm for a finished table height of 762 mm. All twenty timbers use finished 38.1 mm × 88.9 mm stock; nominal sizes are not machining dimensions. Orient each leg's 38.1 mm face along the table length and its 88.9 mm face across the depth. The base is 1498.6 mm × 330.2 mm, centered beneath the top with 12.7 mm overhang on every edge. Acclimate dry, straight lumber and check its actual dimensions. Buy enough stock for all listed blanks plus saw kerfs, end trimming, defects and any jointing loss; these finished cuts are not a no-waste shopping layout. Choose longer stock when configured cuts require it. |
| Side board — nominal 2×4 | 6 | 152.4 × 88.9 × 38.1 | Step 2: build two matching end assemblies. Fit three 152.4 mm side boards on edge between each front/rear leg pair, with their 38.1 mm thickness flush to the legs' end faces. Stack two boards without a gap directly below the tabletop: together they run from 546.1 mm to 723.9 mm above the floor. Set the lower board's bottom at 101.6 mm and top at 190.5 mm. For the source's pocket-hole option, set the jig for 38.1 mm stock and use two 63.5 mm pocket screws at each board end, twenty-four here. Test the jig, screw length and pocket placement on offcuts before drilling the parts; verify screws enter the mating leg without breaking through or colliding with other joints. Clamp square before tightening. |
| Long rail — nominal 2×4 | 4 | 1422.4 × 88.9 × 38.1 | Step 3: connect the end assemblies with four 1422.4 mm rails, fitted between the legs' inner lengthwise faces. Stack two rails on edge at the front and two at the rear, with upper edges matching the two upper side-board tiers. Their outside faces sit 12.7 mm inside the tabletop's front and rear edges. The rails span from 50.8 mm to 1473.2 mm along the length. Use two pocket screws per rail end, sixteen here; stagger pockets clear of the side-board connections. Compare both base diagonals and keep all four feet coplanar before tightening. Do not add rigid upward pocket screws into the tabletop. |
| Top support — nominal 2×4 | 2 | 254 × 88.9 × 38.1 | Step 4: fit two 254 mm supports on edge between the upper front and rear rails, with tops flush at 723.9 mm. Each support's nearer end-facing x face is 431.8 mm from the corresponding tabletop end, so their centers are 450.85 mm and 1073.15 mm from the left end. This inset scales as 17/60 of the configured table length; support size and depth do not scale. Use two pocket screws at each support end, eight here, positioned to enter the upper rails. Keep the top bearing surfaces flush and reserve access for the selected tabletop clips. |
| Tabletop plank — nominal 2×4 | 4 | 1524 × 88.9 × 38.1 | Step 5: lay four 1524 mm planks side by side with their grain running lengthwise, no gaps, for a fixed 355.6 mm depth and 38.1 mm thickness. Finished plank widths must remain 88.9 mm; allow for jointing when procuring stock. Edge-glue the four parallel-grain boards into one panel and clamp flat while the glue cures. Center the top for 12.7 mm overhang on every base edge. IMPORTANT DEVIATION FROM SOURCE: do not glue the tabletop across the side boards or supports, or rigidly screw it across its grain. Use movement-compatible tabletop clips selected and installed per their manufacturer's instructions, allowing seasonal movement across the 355.6 mm depth. Choose clip type, quantity, spacing, engagement and screw lengths for the actual stock and wood movement. Clip hardware and any required grooves are not rendered or included in the frame-screw allowance. Step 6: sand and finish, then place the narrow table on a level surface and secure it with anti-tip wall anchors appropriate to the wall and table, following the anchor manufacturer's instructions. Anchors are recommended; this plan provides no load rating. |
| Pocket-hole screw 63.5 mm | 48 | 63.5 × 4.8 × 4.8 | Frame assembly allowance, not a source-specified total: two screws at each end of twelve frame members (six side boards, four long rails and two supports). The source's pocket-hole option uses 63.5 mm screws; the listed 4.8 mm diameter is nominal. Select washer-head pocket screws and thread type compatible with the actual wood, 38.1 mm stock and chosen jig. Test on offcuts, follow the jig manufacturer's guidance, and avoid overdriving. Movement-compatible tabletop clips, their specified screws and anti-tip anchors must be bought separately; none of these forty-eight frame screws is allocated to rigid cross-grain top attachment. |
About this plan
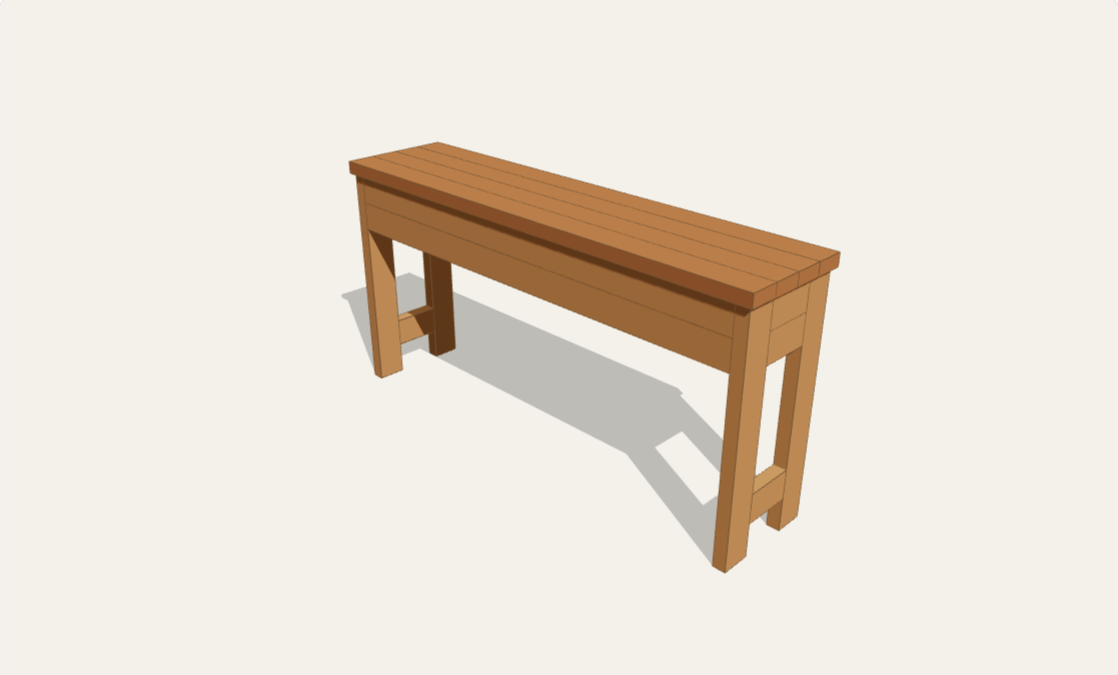
A narrow console built from twenty square-cut 2×4 pieces: four legs, six side boards, four front/back apron boards, two top supports and four edge-joined tabletop planks. The double-height apron gives it a substantial profile while the open space below accommodates baskets. This beginner-to-intermediate pocket-hole build needs a saw, drill and clamps; allow a weekend plus finish curing time. Secure this narrow table to wall framing with suitable anti-tip hardware before use; it is not load-rated or designed for sitting or climbing.
Set a custom length from 1000–1800 mm and height from 700–850 mm. The 355.6 mm depth and actual 38.1 × 88.9 mm stock stay fixed; the model, rail lengths, leg cuts and shareable configuration follow your dimensions. The default matches the reference's 60 × 14 × 30 inch overall size. Use movement-compatible tabletop clips rather than rigid cross-grain screws or glue; fastener machining and purchased hardware are not rendered.
Questions
- Can the console be made deeper?
- This plan keeps the four-board top at 355.6 mm deep and changes only length and height. A deeper version would need different side boards and top supports; do not stretch those joints independently.
- Why are there two apron boards at each edge?
- The source stacks two 88.9 mm boards under the top on both sides and along the front and back, forming a 177.8 mm-high apron. The two additional lower side ties sit 101.6 mm above the feet; there is no lower shelf.
- Should I screw and glue the top directly to the base?
- No. Edge-glue only the four parallel-grain top planks. Use tabletop clips that permit movement across the 355.6 mm depth, following their manufacturer's machining and screw guidance. This deliberately replaces the source's rigid top-to-base attachment.
- Does the narrow table need anchoring?
- Install suitable anti-tip hardware through solid frame members into wall framing before use. Keep children from climbing it. No load rating is supplied; this is a console, not a bench.