 Free plan
Farmhouse dining table
2159 mm × 971.55 mm × 774.7 mm
Cut list
| Part | Qty | L × W × T (mm) | Note |
|---|---|---|---|
| Leg — nominal 4×4 | 4 | 736.6 × 88.9 × 88.9 | Step 1: cut four square legs to 736.6 mm. In each outward-facing lengthwise end face, cut a notch with its bottom 152.4 mm above the floor, height 88.9 mm, and depth 38.1 mm, across the full 88.9 mm leg width. The inner 50.8 mm of timber remains intact. Mirror the notches at opposite table ends; dry-fit before fastening. Base outside dimensions are 1879.6 mm × 863.6 mm, centered under the top with 139.7 mm end and 53.97 mm side overhangs. Notched legs remain four physical blanks, not twelve cuts. |
| Lower cross support — nominal 2×4 | 2 | 863.6 × 88.9 × 38.1 | Step 2: at the center of each 863.6 mm support, notch 88.9 mm wide across the full 38.1 mm thickness and 38.1 mm deep from its top edge, leaving 50.8 mm below. Seat each support on edge in an end pair's outward leg notches, flush with the outer leg faces, bottom at 152.4 mm and top at 241.3 mm. Allocate three 76.2 mm wood screws per support-to-leg joint, twelve total; predrill and stagger clear of edges and the center notch. |
| End apron — nominal 2×4 | 2 | 685.8 × 88.9 × 38.1 | Step 3: fit each 685.8 mm end apron on edge between the front and rear legs' inner faces. Its outward x face is inset 25.4 mm from the base end; its top is flush with the leg tops at 736.6 mm. Set the pocket-hole jig for 38.1 mm stock; use two 63.5 mm pocket screws at each apron-to-leg joint, eight total. Do not drill upward pocket holes for rigid tabletop attachment; use the movement-compatible clips described below instead. |
| Long apron — nominal 2×4 | 2 | 1701.8 × 88.9 × 38.1 | Step 4: join the two end assemblies with 1701.8 mm long aprons between the legs' inner x faces, on edge with tops at 736.6 mm. Inset their outward z faces 25.4 mm from the base sides. Allocate two 63.5 mm pocket screws at each apron-to-leg joint, eight total. Check both base diagonals for square before tightening. Reserve room for movement-compatible tabletop fasteners, not upward apron-to-top pocket screws. |
| Center stretcher — nominal 2×4 | 1 | 1879.6 × 88.9 × 38.1 | Step 5: lay the 1879.6 mm stretcher flat, centered across the depth, with its underside at 203.2 mm and top at 241.3 mm. Its ends occupy the central notches in the two lower cross supports and finish flush with the base end faces; it rests on their remaining timber, not on top of the unnotched edges. Allocate two 63.5 mm pocket screws underneath at each end, four total; position the pockets to enter remaining support timber. |
| Tabletop plank — nominal 2×8 | 4 | 1790.7 × 184.15 × 38.1 | Step 6: cut four 1790.7 mm planks; lay two on each side of the wider center plank, grain running along the table length. Edge-joint and glue the five parallel-grain boards into a panel 971.55 mm wide, with no gaps. The finished board widths must total 971.55 mm; allow for jointing when buying stock. Choose longer stock when the configured cut exceeds the source's stock lengths, and allow for saw kerfs and end trimming. Acclimate dry lumber before assembly. |
| Center tabletop plank — nominal 2×10 | 1 | 1790.7 × 234.95 × 38.1 | Step 6: place this 234.95 mm-wide board between the two pairs of 184.15 mm planks. The panel extends from 184.15 mm to 1974.85 mm along the length; all five boards finish 38.1 mm thick, with the final tabletop upper face at 774.7 mm. Clamp flat while the parallel-grain edge joints cure. |
| Breadboard end — nominal 2×8 | 2 | 971.55 × 184.15 × 38.1 | Step 7: cut two breadboard blanks to the measured joined panel width, nominally 971.55 mm; each covers 184.15 mm of the table length. IMPORTANT DEVIATION FROM SOURCE: do not rigidly pocket-screw or glue the breadboards across the panel width. Use floating loose-tenon breadboard joinery suitable for 38.1 mm stock: fix only the center, elongate the outer mortises and peg holes in the panel's width direction, and leave the outer joints unglued so seasonal movement is free. Select tenons, pegs, mortise depths and movement allowance for the actual wood species and moisture range before machining; loose tenons preserve these listed butt-to-butt blank lengths. Joinery mortises and purchased tenons/pegs are not rendered. Step 8: center the top on the base and attach with manufacturer-specified movement-compatible tabletop clips and matching screws, never rigid upward apron screws or glue to the base. Procurement allowance: sixteen clip assemblies (five per long apron, three per end apron), plus the selected breadboard tenons/pegs and wood glue; verify clip count, spacing, slot travel, screw length and installation against the chosen system. Keep screws clear of the top surface and allow movement across the full panel width. Sand and finish all faces; this adaptation provides no load rating. |
| Pocket-hole screw 63.5 mm | 20 | 63.5 × 4.8 × 4.8 | Assembly allowance, not a source-specified hardware total: sixteen for the eight apron-to-leg joints and four underneath the stretcher ends. Buy washer-head pocket screws compatible with 38.1 mm stock and the chosen jig; the listed 4.8 mm diameter is nominal, and thread type must suit the wood. Tabletop edge glue-up, floating breadboard joinery and movement-compatible top clips do not use these rigid connections. Clip-system screws and breadboard tenons/pegs must be procured separately per their selected joinery system. |
| Wood screw 76.2 mm | 12 | 76.2 × 4.8 × 4.8 | Assembly allowance: three at each of four lower-support-to-leg joints. The source specifies this screw length but not a complete quantity; the listed 4.8 mm diameter is nominal. Select screws suitable for the wood and joint, follow the manufacturer's pilot-hole guidance, and countersink without overdriving. These screws fasten only the notched base supports; they are not tabletop fasteners or a load-capacity specification. |
About this plan
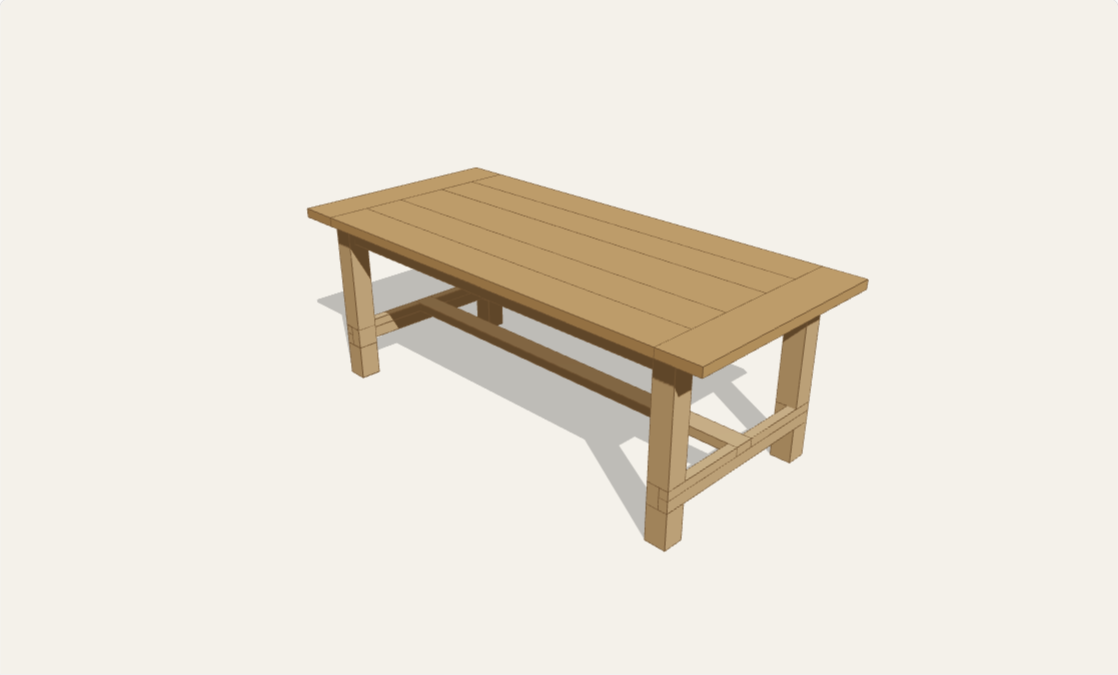
Build a farmhouse dining table with four solid 4×4 legs, pocket-screwed 2×4 aprons, two notched cross supports, and a low longitudinal stretcher. Four 2×8 planks flank a wider 2×10 center plank, with a breadboard across each end. This independently modeled adaptation follows Ana White's Farmhouse Table — Updated Pocket Hole Plans. The 3D model shows the leg and support notches, including their shape in exploded view; the cut list gives full blanks and machining notes. This is an intermediate project: allow a weekend for cutting and assembly, plus glue and finish curing time.
Customize the finished length from 1600 to 2400 mm and height from 710 to 800 mm. Depth stays 971.55 mm, based on the actual board widths; measure your dressed stock before cutting. The default preserves the source's 85-inch length, 29-inch legs, and 5½-inch end overhangs. Unlike the source's rigid tabletop attachments, this adaptation calls for floating breadboard joinery and movement-compatible tabletop fasteners to accommodate seasonal wood movement. It is not load-rated. Outputs are a live cut list and shareable assembled/exploded 3D model; no CNC file is offered.
Questions
- Which dimensions are customizable?
- Overall length is 1600–2400 mm and finished height is 710–800 mm. The 971.55 mm width stays fixed to the five-board layout. Leg lengths, aprons, stretcher, and tabletop cuts update together; lumber sections and notch positions stay fixed.
- How are the stretcher joints made?
- Each leg has an outward-facing notch starting 152.4 mm above the floor, 88.9 mm high and 38.1 mm deep. A cross support seats in the two notches at each end. Its centered top notch is 88.9 mm wide and 38.1 mm deep, supporting the flat longitudinal stretcher. Practice on scrap and verify fit before fastening.
- Why not glue and screw the breadboards across their whole width?
- The five-board top expands across its width, while the end boards move in a different direction. A rigid cross-grain joint can split or distort the top. Use a floating breadboard joint with a fixed center and outer joints that can slide, and movement-compatible fasteners between the top and aprons. The model shows finished outer shapes, not detailed breadboard mortises or fastener machining.
- Do the stock widths need to be exact?
- The model uses actual nominal-lumber sizes: 7¼-inch 2×8 boards and a 9¼-inch 2×10 center plank, totaling 38¼ inches. Dressed or reclaimed stock may differ. Dry-fit the top and measure its joined width before cutting breadboards; do not substitute thinner or narrower stock without revising the joinery.
- Does this include CNC files or a tested load rating?
- No. This is a saw-cut lumber project with notches and joinery operations, not a CNC panel kit. The live cut list includes blank sizes and assembly notes; review the linked source for illustrated construction. Neither the custom sizes nor this adaptation have a tested load rating.